Wednesday 28 February 2018

[Stampin up] Chocolate Holder(Table Favor) - Koffee Break Kraft Kit_Jan


Hi Crafty friends! 

It's January Koffee Break Kraft Kit, One part of Thanks gift pack that sent out to customer who shop with me on January :-)

We demonstrator can not send out stamped image, so I try only use die sets or scoring when I create "Koffee Break Kraft Kit" every month. 


But I also leave measurement and product list to make this project for crafters who don't have this kit. so anyone can make this project without the kit. (Hope It makes sense)


This month's project is a chocolate holder.
Have you tried a kit kat chocolate bar before?!?
I used not like it... I like simple chocolate, not with weɪfə...!

Last month someday, Suddenly I desperately wanted to eat a kit kat... 
So weird, isn't it?
.
.
.
.
NO,
I AM NOT PREGNANT!!! :-P


Since I love it so much, I wanted to make a holder/wrap for it. so I can send it to customers!
If I didn't fussy cut the unicorns, It could be a quick project. But wasn't that bad to cut it from Myths & Magic Specialty Designer Series Paper.


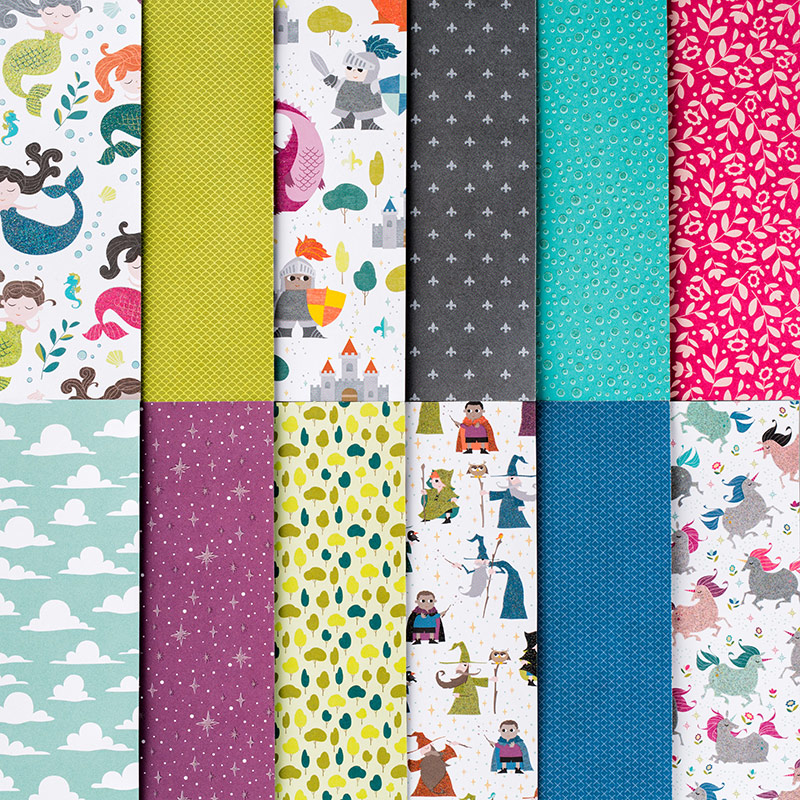
I love this paper pack! 
I Love the patterns and printed images, especially printed images which I can cut them out to use small projects :-)


Finished size: 4-1/4" x 1-1/4" x 3/8"
so it's so perfect for treats or table favors!


Everything is prepared, Die cutted/ Punched.
You will need a...(Who get this kit)

- Double sided tape/glue
- Scissors 

and Your Time!!


who doesn't have kit, 
you need few tools to make this one. (See above a photo and down below a product list - some of tools will be available from 3rd January)


Isn't it so Cute? love this Designer series paper!!


Measurement 
Base Paper: 9-5/8" x  1-1/4"
Score- Long side   7/8"   1-1/4"   4-7/8"   5-1/4"

belly band: 3-3/4" x 3/8"


Here’s a video how I made this using the kit.
you can watch on my youtube channal
Product List

Hope you enjoyed this project :-) If anyone interested to place an order for Stampin' Up!, Here is a link you can simply click the pink box.


Please do use the hostess code to support Willowpiggy :-) (hostess code shown in the top right of my blog for the current one!) If your order is over £150, please don’t use this code, You can be hostess and get the Rewards! Please feel to email me or visit FB page If you have any questions!

Jerim/Willowpiggy xxx


Saturday 24 February 2018

Birthday Fancy Fold Card - InspireINK Blog Hop Stampin up supplies


Thank you for joining us on InspireINK Blog Hop!
Each month we are set a challenge to creatively stretch our imaginations. The products we have used are all available in the current Stampin’ Up!® catalogues. To hop along, please use the buttons at the bottom of the post to keep hopping. 

This month's Theme is


I don't think I've never made any different fold type of card. I had a chance to make last time, but I made an album instead.

This time I made a pop up box card for my friend's son - Birthday boy!


This card's finish size is 4-3/8" x 5-1/2"
It will perfectly fit in Standard C6

I used one of pattern sheet from "True Gentleman Designer Series Paper"


so many colours on this sheet, so I wanted all of stamp images to be stamped on Black ink and give small accent for colouring.


It's so simple to make!

Cut cardstock -4" x 11-5/8"
Score - Short side 2-1/4"  //  Long side 3-1/2" , 5-1/2" 9", 11"
end to end put together, fold down front and both side Only.
glue small strips- 4-1/2" x 1" (Score  Long side - 1/2" each side) I used 2 strips (you can use them as many as you want)
 inside box so they become bridge?!
Decorate with Pretty DSP(Designer Series Paper)
-1 of  3-1/4" x 1-1/2"
2 of 1-3/4" x 1-1/2"
2 of 3-1/4" x 3-7/8"    (1 DSP - Deco, 1 White card - Message)
and embellishments
I cut the Acetate Card Box to make few clear strips for floating embellishments.

I will add a process video for this card tomorrow, so If you want to see the process, Please come back again!
------------------------------------------------------------------------
Video added 25/02/2018


Thanks for visiting my blog today, I hope you've enjoyed my projects today. Next Blog is Runnung by Lovely Lady "Janice Thomson" click Next Button to keep hopping!


Product List

**I get a small commission at no additional cost to you when products are purchased through links I share here. Thank you for your support :-) **

Hope you enjoyed this project :-) If anyone interested to place an order for Stampin' Up!, Here is a link you can simply click the pink box.


Please do use the hostess code to support Willowpiggy :-) (hostess code shown in the top right of my blog for the current one!) If your order is over £150, please don’t use this code, You can be hostess and get the Rewards! Please feel to email me or visit FB page If you have any questions!

Jerim/Willowpiggy xxx

Sunday 18 February 2018

[Scrapbook Page] Love - February 2018 Scrapbook Sunday Blog Hop


Thank you for joining us on our Scrapbook Sunday Blog Hop!


Each month we are set a challenge to creatively stretch our imaginations. The products we have used are all available in the current Stampin’ Up!® catalogues. To hop along, please use the buttons at the bottom of the post to keep hopping. 


This month's Theme is "Love"


You may know already that I don't really like Heart shape, especially hear with fat body and tail (?) If you read my previous blog post.
But this time, some reason I wanted to use heart that I don't like so badly when I saw this stamp image in set called "Lots Of Love"


It's a small image to fill up 12" x 12" paper,
I stamped it on white and colour paper, fussy cut out, die cut and punched out.
end up I liked the idea that stamped it with Basic Black Archival Stampin’ Pad on whisper white cardstock and punched out with 1-3/4" Circle punch, then glue it on coloured cardstock which punched out with 2" circle punch.

But I wasn't sure how many I need and which colour cardstock I was going to use, so I stamped it on cheap print paper and punched out, so I could play around them on the big page. like that....


Because I don't have many different colour cardstocks, so I had to chose them within what I have.
This is how I choose colours while I design the page.
Making colour chart using Stampin' Write Markers.(which one go better next which colour...)


There is a small problem to use write marker on Basic Black Archival Stampin’ Pad stamped image that some will appear on stamp image that used with darker markers as you see in the photos down below.
I guess you can just fill up only white space If the marks are bothering you.


Here’s a process video how I made this scrapbook page, also include some tips and finishing the project with an uninvited guest ;-)


ou can watch on my youtube channel
Image result for youtube logo


Thanks for visiting my blog today, there are so many amazing ideas and inspiration you don't want to miss. Remember that currently you are at my blog - Jerim Dickins, so check the blog hop line up list to see who is next in the list.


>>Jerim Dickins<< You're Here :-)


Product List

**I get a small commission at no additional cost to you when products are purchased through links I share here. Thank you for your support :-) **


Hope you enjoyed this project :-) If anyone interested to place an order for Stampin' Up!, Here is a link you can simply click the pink box.


Please do use the hostess code to support Willowpiggy :-) (hostess code shown in the top right of my blog for the current one!) If your order is over £150, please don’t use this code, You can be hostess and get the Rewards! Please feel to email me or visit FB page If you have any questions!


Jerim/Willowpiggy xxx